How to Start a WordPress Blog on Bluehost – The Ultimate Tutorial –
This piece is put together to teach you how to create or start a WordPress blog on Bluehost. Blogging is the not-so-new money-spinning business in town, and you can rake in a reasonable amount of money if you know how to play your card well. WordPress provides one of the best templates for blogging, and you can always transfer WordPress templates to Bluehost for a more exciting blogging experience.
The money coming in through blogging may not be much at the start, but it can build up over time. Bluehost is not free, but you will get good value for your money. They will give you a free blog domain when you buy hosting from Bluehost for a smoother blogging experience.
Why is Bluehost the best?

Bluehost offers one of the best web hosting services for WordPress blogging. In fact, Bluehost gives one of the cheapest hosting services for WordPress blog. The experience with this hosting service is unique. The cost of hosting with Bluehost can be as low as $2.75 per month; that’s pretty cheap, you will agree.
You can buy a 12-month plan at this rate to get a free domain. You can also go for the 36-month plan for an even lower price.
Check below for some of the great reasons to choose Bluehost above others:
- Top class technical support
- Free blog domain
- Free WordPress is available through Bluehost
- It is easy to use, and just anyone can easily create a WordPress blog using Bluehost
- There is money back guarantee
- It is highly affordable; you can get it for as cheap as $2.75 per month.
- Your readers will see you as being professional
- You can be self-hosted if you desire to monetize your blog
In the next section of this write-up, we will learn about How to start a WordPress blog on Bluehost.
Register the domain name
First of all, you should choose a domain name. When selecting a domain name, choose one that relates to your business or blog content. This way, people can remember it easily. A single name domain name is also better. As much as possible, avoid using special symbols, like a dash, hyphen or dot. This way, your potential visitors will not have problem remembering your domain name.
The tips below are points to consider when choosing a domain name;
- It should be easy to type
- Keep it as short as possible
- Include your domain keywords in the domain name
- Focus on your area if your business is local
- Avoid hyphens and numbers
- Make the domain name memorable
- First research the domain name to be sure the name is not trademarked
- Use the right or appropriate extension; .com is always the best for a blog concerned with community, commerce, and company. .biz or .net may also work perfectly.
- Build and protect your brand by buying multiple domain extensions and misspelled versions of the domain name
- Act very fast if you must get the domain name of your choice. Go Daddy is one of the best places to get your desired domain name.
Buy hosting for your blog
As hinted earlier, it is effortless to set up WordPress blog on Bluehost. Bluehost also provides one of the best and cheapest hosting plans in the industry today, making it the right place to buy the hosting plan for your blog.
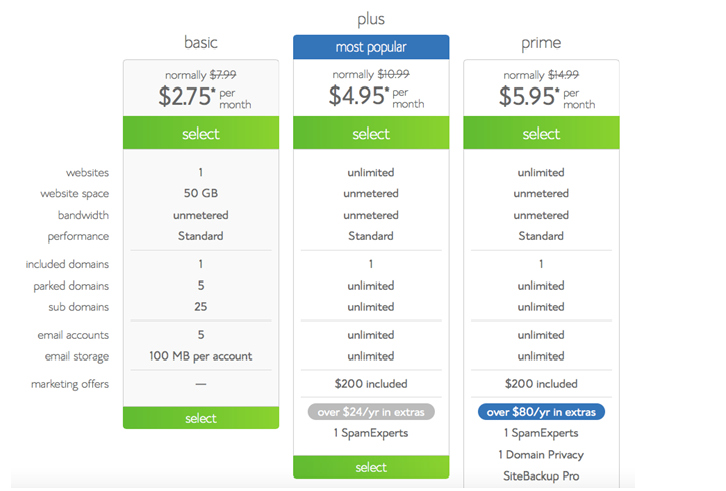
Bluehost provides three hosting plans; they are:
- Basic plan
- Plus plan and
- Prime plan
The Plus plan is the most popular among the three.
The following are the features of the Basic plan:
- It will cost you $2.75 per month when you select the 36-month plan. The 24-month plan will cost $3.95 per month, while the 12-month plan will cost $4.95 per month.
- You will have access to just one website
- Website space available is 50GB
- Bandwidth is unmetered
- Performance is standard
- One domain is included in this plan
- Number of parked domains is five
- Number of subdomains is 25
- Access to 5 email accounts
- 100 MB storage space for each of the email accounts
- No marketing offer is available
The following are the features of the Plus plan:
- It will cost you $4.95 per month or $24 per year
- Access to an unlimited number of websites
- Website space is also unlimited
- Bandwidth is unmetered
- Performance is standard
- 1 domain is included
- A parked domain is unlimited
- Subdomains are unlimited
- Unlimited email accounts
- Limitless email storage
- $200 marketing offer is included
- One SpamExpert is included
The following are the features of the Prime plan:
- It will cost you $5.95 per month
- Unlimited number of websites
- Website space is unmetered
- Bandwidth is unmetered
- Performance is standard
- 1 domain is included
- Never-ending Parked domains
- Boundless subdomains
- Infinite email accounts
- Unlimited email storage
- $200 marketing offer included, along with extra $80 per year
- 1 SpamExperts included
- 1 Domain Privacy included
- SiteBackup Pro included
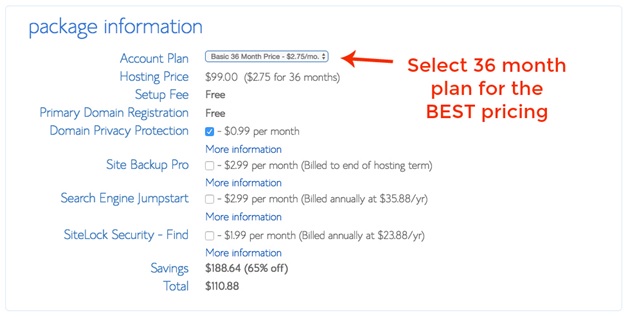
The basic plan will just be perfect for your purpose for now. Domain Privacy Protection will cost you $0.99 per month; it will help protect the contact information on your website.
The following are simple steps to take when buying a hosting plan from Bluehost
- First of all, visit Bluehost, then click on “Get Started Now.”
- Next, click on any of the plans you prefer among the three mentioned above.
- Then enter the domain name you have earlier registered. You can also sign up for a new domain name on Bluehost.
- Next, provide your payment and personal information
- Afterward, provide a password. Make the password as secure as possible.
Connect your hosting and your domain
You will have to connect the hosting account to your domain name if you have earlier bought your domain name from GoDaddy. GoDaddy has a special support page where you can set up nameservers for the domain names.
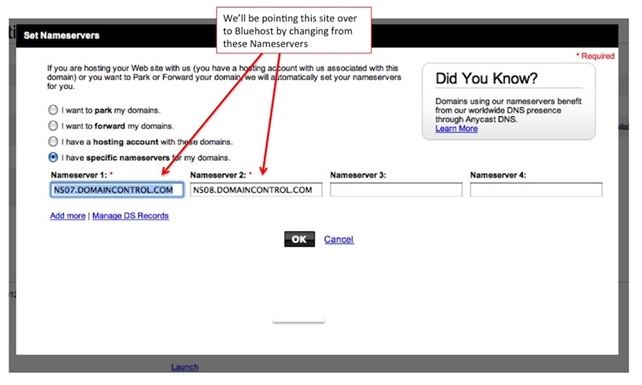
The instructions provided below will guide you on how to modify your DNS Nameservers anytime you use Bluehost for your hosting and GoDaddy for your domain.
- Log into your GoDaddy account and visit the Account Manager section
- Next, select Manage Domains from the drop-down menu of Domain Names. You can also check the Manage Your Account list
- Next, choose the particular domain name you want to modify by using the checkboxes. You should click on Set Name Servers next.
- Afterward, provide the information for the updated name server in the space made available for that. You can find it under the blue Name Servers on the right side of the page. Next, click on Save Changes located at the bottom. The entries will look like this: ns1.bluehost.com or ns2.bluehost.com.
Afterward, you will be required to add your domain as an add-on domain to the Bluehost web hosting you have bought. This can be done when you click on Domains after logging into the Bluehost web hosting account. Next, click on “Assign.” The steps are straightforward to follow.
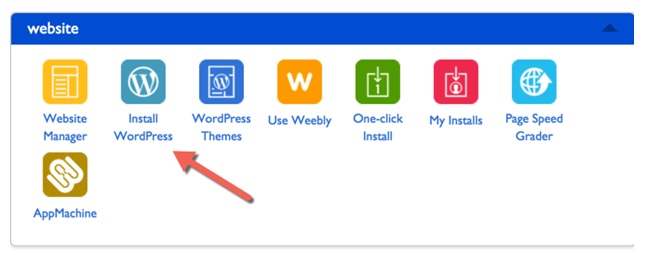
Install WordPress on Bluehost
This part is not as difficult as many people think. It is very easy and free to create WordPress blog on Bluehost follow the steps below to get it done:
- Bluehost will guide you on how to start your blog on their platform after you have created your platform
- First of all, you will be required by Bluehost to pick a theme. There are many themes you can choose from. Browse through the list and go for the one that you like. If you like, you can change the theme at a later date. Instead, you can skip this step to the next.
- Next, click on “Start Building.”
- You can then choose “Personal” or “Business” on the next screen. Your choice depends on what you like. Also, you can click on “I don’t need help.”
Now that you have a WordPress blog, you can start working on the design of your blog and adding top-quality contents to it.
Certain aspects of this process can lead to confusion, like pricing, picking a plan, setting it up and so on. If you ever encounter problems at any of these points, just contact Bluehost customer service, and they can guide you aright on how to get things done stress-free. WordPress is also very easy to use. You can add new posts by clicking on “Posts.” Click on “Media” to add an image to your post. Find this link on the left-hand side of the page. Add items to your footer, sidebar and so on by clicking on “Appearance,” then “Widgets.”
Conclusion
The steps above are easy to follow, and you can set things up even if you are a first-timer. Many of the widgets on WordPress are free, and the free ones may be adequate to keep your WordPress efficiently running. However, adding a couple of paid widgets can improve the quality of the content posted on your blog.
“I am an independent BlueHost Affiliate, not an employee. I receive referral payments from BlueHost. The opinions expressed here are my own and are not official statements of BlueHost.”
Related articles: